
I got my Basic Grey warehouse box 2014 in the mail today so I thought I'd do my first unboxing video and show you what's in it! :) Enjoy.
Happy Sunday!!
There's a new Stamp of the Week at Unity Stamp "One Single Wish".
This stamp is just so cute, don't you think? I kinda made it into a shaker card by cutting a circle in the middle of the balloon and added golden stars :)

Here's a close up! :)

Have an awesome weekend!
Challenges:
Seize the birthday
Sweet Stampin Challenge "Paper pieced"
Simon Says Stamp
Pile it on "kawaii/cute"
PDE linky party "lots of layers"
CAS(E) this sketch #82
Do you know that Cutting Cafe has some amazing files?
Like this pizza box I made for this week's Inspiration Time with the DT girls.

It was easy to make and on the cover, I've added the 3D paper flowers with some bling :) Isn't the dimension so pretty?


Inside, I made the two divider boxes to separate the embellies.

This box would be perfect for someone as a gift or to organize your scrappy stuff.
Have an awesome scrappy weekend ahead.
Challenges:
Hello! I am starting off the #unitystamp Thursday Hop today and we have an awesome new kit in store for you!
But before that, do you know that #unitystamp has some amazing monthly kits like the Kit of The Month for only $26/month? I LOVE these kits because they are so versatile. Not only are they perfect for card makers, but you can use it for canvas arts, tags, journals and more.
***
Here's a card I made using the KOTM 01/14 "Be your own kind of beautiful" and using the NEW #hashtagkit.

Isn't the #hashtagsentiment so much fun?? ;) I added some distress glitter onto the cupcake too for the extra bling!

I've also made another card using a past kit - KOTM 03/14 "The reason someone smiles" and inspired by the latest Unity {be inspired} color/sketch challenge. I embossed the sentiment with some gold embossing powder and then colored it in with some watercolor.


And finally, I made some stamped these amazing images from the current KOTM 06/14 "In Love with Love" onto some Project Life journal cards.


***
At #unitystamp, we have a #hashtagsale going on! How fun is this?

And with a #hashtagsale comes a brand NEW #hashtagkit !!!
These would be perfect for cards, Project Life, tags.. the possibilities are endless! :)

We have TWO amazing Unity filled prize packages to giveaway. Leave a comment on EACH blog in the hop (including the Unity blog) for your chance to win. The winners will be announced Saturday night on the Unity blog.

Challenges:
It's Father's Day and I made another card.. this time a SuperHero Dad card :)


To all Super Dads, happy POW-WHAM-KAPOW day! :)
Challenges:
It's Father's Day - so hey hey hey! Wishing all Fathers a BLESSED happy Father's day!

This cutie little chick with a tie is Unity Stamp's Father Peep created by Lisa Arana.

Have an awesome weekend with your fathers :)
***
And just in case you missed my NEW Video on Youtube I did for Unity Stamp's Inspiration Wednesday - Here's the video! :) Feel free to leave comments and SUBSCRIBE if you like :)
Challenges:
It's Inspiration Wednesday on the Unity Stamp blog and I made this card using the SMAK 05/14 "Day Dreaming" and the "Birthday Jubilee" kit.


For this card, I made a step-by-step video for you using the "Distress Emboss Resist" technique. Feel free to watch - leave me a comment or SUBSCRIBE if you like it :)
My inspiration came from this beautiful poster with this awesome quote.
Aren't those pretty gradient pinky clouds so pretty?

Have a beautiful week ahead and craft on! :)
Challenges:
Whoopsi Daisy Challenge
Seize the birthday
Do you know how much I LOVE Unity Stamp? They have the most awesome stamps and I am sooooo happy to be part of the team.
Taking about LOVE .. I also LOVE all my subscribers, followers and friends. THANK YOU for the continuous support that you have shown me and the LIKES and comments that you have given me on my Youtube Videos, Facebook posts, blog posts.. YOU are AMAZING.
(Apologies there is no video up for this week but I will try to make one very soon again)
***
So onto the blog hop today - it's all about LOVE :)
There are NEW KOM, SOTW, LOL, SMAK and even Sentiment kits. What about NEW releases too? Gosh. Can Unity get any better? YES they DO!
The new KOM kit is just so AWESOME. Here's what I created with it.

Don't you just LOVE those little jars?

And a jar of oranges with flowers? OH MY!!
(The sentiment is from the NEW sentiment kit that will be released next week!)

And did you see the NEW releases?
I created a mini layout with this FABULOUS beach girl image!

Hint: I am going for a beach trip soon. :) Can't wait!

Can you believe that we are having our MID-year SALES? *WOW*

Oh, and let's not forget the FREEBIES!

We have TWO amazing Unity filled prize packages to giveaway. Leave a comment on EACH blog in the hop (including the Unity blog) for your chance to win. The winners will be announced Saturday night on the Unity blog.

Challenges:
Whoopsi Daisy challenge "Bright colors"
Get Inky challenge "Summer"
The Paper Shelter "Flower power"
Stamp and Create "Thank you"
Photo Pocket Page Challenge in the Moxie Fab World
Have you heard of a card in a box?? Well, it's the trend right now and guess what? That's what we all made for this week's Inspiration time at The Cutting Cafe.
I've always wanted to make one for the longest time ever... but never got to it and thought it was too difficult to even attempt. Well, it's pretty simple actually!
Here's my "Secret Garden" card in a box!

It's pretty impressive if you present this to your loved one and friends, don't you think?
The kits I used are:

I've actually misted the flowers with some Heidi Swapp color shine (it's really shiny in real life - but my camera is not doing it enough justice!). I also added some liquid pearls and stickles to the flowers for that extra bling.
I've also added a pretty big bow on the front of the box! :)

So how do you actually give this card to somebody?
Guess what? It closes flat down! It's MAGIC!! :) Easy-peezy to just slip it right into an envelope!

These are so much fun to make - I will go make my next one soon! :)
Challenges:
AUD sentiments Bingo challenge - {Die cuts, 4 word sentiment, Ribbon}
Artistic Inspirations #94 - {Happy birthday to you}
Whoopsi Daisy Bright colors challenge
Crafty Girls challenge
Seize the Birthday
Simon Says Stamp Monday challenge
So, just last week - I finally got my Copic Ciao Set B markers and I am estatic! More colors to play with :) And when I got my Ciao markers, first thing I did was to make my own lid labels.

So before I show you how ...
For those who are new to Copic markers, here's a quick difference between the types of Copic markers in the market.
1. Copic Sketch markers


2. Copic Ciao markers
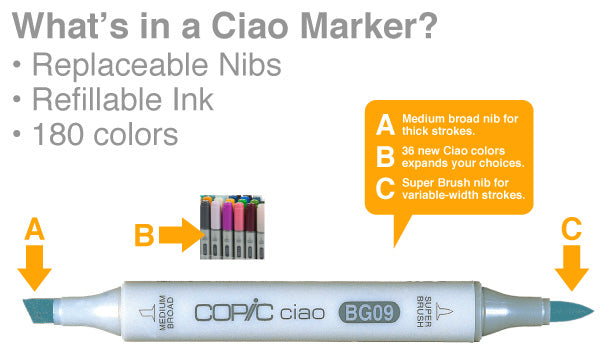

3. Copic Wide markers


Images taken from the Copic store.
***
As you can see, the Copic Ciao markers do not have a label on their lids. They are the most economical - guess that's why we have to label it on our own :)
Fret NOT! I have the simple solution for you.
***
1. Download the Copic Ciao lid labels from Asela Hopkin's blog HERE.
Thanks Asela for the free file!
2. Print the chart out and start punching with a standard sized office-2hole-puncher!
3. Get some mini glue dots and stick it onto your Ciao marker's lid and ... this is the beautiful result! Pssst... I re-arranged them in their color groups too! :)

(At the time I took this shot, I couldn't complete labeling it as I ran out of mini glue dots.. haha! But you get the drift)
Oh!! And I also did a color chart for my markers too.

Here's the color chart I used - created by Ellen Jarvis (Thanks!) HERE.
Hope this post has been helpful for all Copic Ciao lovers :) Have an awesome week ahead.
