Scrappy Scrappy

Facebook Instagram Youtube Twitter Bloglovin
HOME | SCRAPPY RESUME | VIDEOS | CONTACT ME
Happy Mid Week! 
Just a few more days to the weekend, so hang in there. :)

Today for Inspiration Time over at The Cutting Cafe blog, we are to recycle and reuse! What a fun idea Regina had.

So I got a cereal box that I was about to throw out and made a photo frame! 

ScrappyScrappy: DIY Recycled Photo Frame #scrappyscrappy #thecuttingcafe #diy #photoframe #printables

Yups, I handmade this for my hubby. Since he loves cycling, I showcased his awesome bike here and made him his very own "show off" display :)

I used the Bicycle Background set & Cameras Everywhere Background Printable set -- which I printed on some patterned paper. Then I embellished it with a simple sentiment from Heidi Swapp, a die cut piece and some enamel dots.

****

So, let me show you my quick process on how I made this frame.

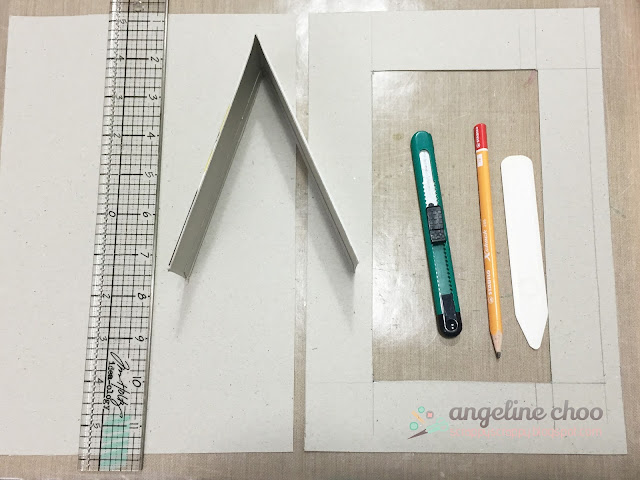
First up, get a cereal box and cut out these 3 pieces:
+ The frame
+ The backing piece
+ The support piece

ScrappyScrappy: DIY Recycled Photo Frame #scrappyscrappy #thecuttingcafe #diy #photoframe #printables

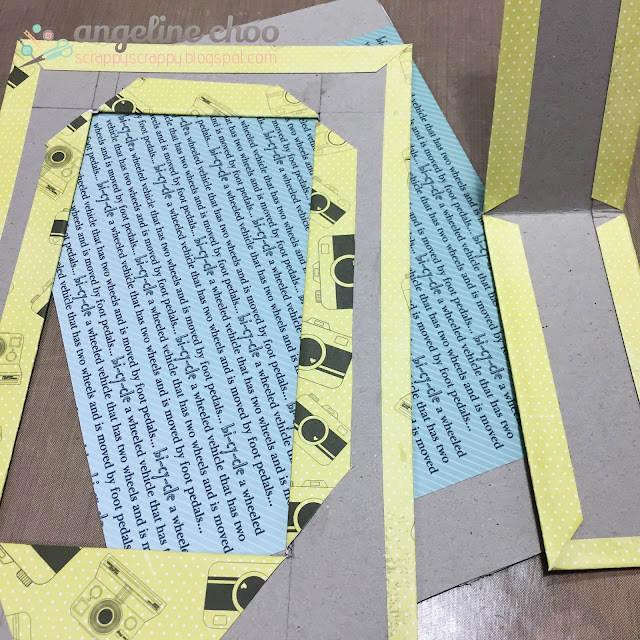
Next, get some patterned paper and begin to WRAP! :)
As you can see, it doesn't need to be perfect.

ScrappyScrappy: DIY Recycled Photo Frame #scrappyscrappy #thecuttingcafe #diy #photoframe #printables

Finally, just piece everything together and you are done!

ScrappyScrappy: DIY Recycled Photo Frame #scrappyscrappy #thecuttingcafe #diy #photoframe #printables

For the support piece, I added 2 buttons and some twine to it to "limit" the opening so that it will be able to stand upright.

ScrappyScrappy: DIY Recycled Photo Frame #scrappyscrappy #thecuttingcafe #diy #photoframe #printables

Hope you've enjoyed my DIY project for this week. 
For more inspiration, do hop on along to The Cutting Cafe blog. 
Leave a comment on each blog and you may be winning any 3 sets of your choice from the store! 

Happy hoppin'. :)

Share
Tweet
Pin
Share
4 comments
It's Inspiration Time at The Cutting Cafe again and this week it's all about packaging.

For today's post, I have used the Coffee Cup Holder set and altered it.
 Rather than using it for coffee (since I am not very much of a coffee drinker), I have used it to store my scrappy supplies instead :)


I love how cute the holder came out to be. I've added some flowers and bling too :)
You could opt not to have the holder and instead use it as boxes to store your supplies.


Remember to go to The Cutting Cafe blog and leave a comment for a chance to win any 3 sets from the store. YES!! 3 sets! :) Regina is awesome that way.

Happy weekend.

Share
Tweet
Pin
Share
9 comments
When I saw this cut file from SVGCuts, I went "Oooh la la!!". This was just perfect!

I made this 3D vintage camera for my buddy as his wedding gift (since he loves cameras too) and to capture the moment forever :) 


If you did not know, this awesome camera is also a gift box! :)


Congratulations to Mr and Mrs G ! Wishing you happiness forever :)

Share
Tweet
Pin
Share
3 comments
It's Inspiration Time at Cutting Cafe and this time we have some really fun cut files to showcase. :)

I've chosen the Top Hat template and made this fun top hat for myself. It's PARTY time!


Don't you think it's just adorable? You can make it any style you want and I've chosen the shabby vintage chic with some blings and pearls. To put it on, just adhere two alligator clips at each side of the hat (on the bottom) and you're ready to go!


A girl has to dazzle, right? :)

Share
Tweet
Pin
Share
8 comments
Do you know that Cutting Cafe has some amazing files? 

Like this pizza box I made for this week's Inspiration Time with the DT girls.


It was easy to make and on the cover, I've added the 3D paper flowers with some bling :) Isn't the dimension so pretty?


Inside, I made the two divider boxes to separate the embellies.


This box would be perfect for someone as a gift or to organize your scrappy stuff.

Have an awesome scrappy weekend ahead.


Challenges:
The Paper Shelter "anything but a card"
Simon Says Stamp Monday challenge  

Share
Tweet
Pin
Share
12 comments
Recently, I have this obsession for cars.. Yes, cars!! So today's post is dedicated to all the car lovers (and surfer dudes + cyclists too!).

I made this kombi for my hubby - in his favorite color from the SVG Cuts Surf Shack kit - using the German Bus. FYI, this piece of decor doubles up as a gift box! :)


Noticed the bicycle behind? I added that on with the surfboard on top. CUTE right? :)


This is the side view. I added some metal railings on top :)


Oooh, and a personalized license plate too :)


If you're interested to order your very own customized Kombi, feel free to drop me a mail! :)


Challenges:
Cut it up "National Bicycle Month"
MilkCoffee Challenge

Share
Tweet
Pin
Share
9 comments
It's Inspiration Time at The Cutting Cafe and today, I have a flower block for you :) A cute little box perfect for a gift hidden inside!


The box is from the Block Set. This set is way awesome as it contains 4 different block sets when you purchase just 1!


Here I did a little mix-and-match with some others kits.
The chevron zig zags is from Egg Goodie Box and the huge flower on the lid is from Layered Flowers

Here's an aerial view of the flower which I have added a flower resin in the middle. 


Thanks for visiting. Now, go shop and get the most awesome cut files from The Cutting Cafe :)


Challenges:
Cut it up: National Bicycle month

Share
Tweet
Pin
Share
8 comments
Hey. It's the weekend and I am off to a baby shower! I have this gift bag for my friends - who are expecting a baby girl this May. I took a plain paper bag and just decorated it with patterned paper, washi, felt flowers and of course a card :)


Here's a close up of the card I made last week :)


Happy Weekend to all of you! :)

Share
Tweet
Pin
Share
2 comments
If you've been following me - you'd know that I recently got my Cameo. Yups. My dream machine!!! I've admired beautiful projects and designs from SVGCuts. Mary is amazing at creating and I truly admire projects especially from Thienly Azim of Mod Paperie. Thanks for all the tips and tricks too :)

So I got my first few kits from SVGCuts and started creating! I cannot believe how easy and beautiful this turned out.

The lamp is from the Maison de Madeline kit and the snowflake is from the Winter Gazebo kit.

Here's a close up on my first ever SVGCuts project! :)


I can't wait to create more!! :) Happy week ahead everybody.

Share
Tweet
Pin
Share
No comments

It was a happy surprise when Madge of Housecalls By Scrappin Madge mailed me and said that I will be getting the November's Harvest Tradition kit and will be Guest Designing for the whole month of November. I was ecstatic!! Check out how pretty this kit is!! 


Yes, you get that many things in this kit. Isn't it so gorgeous?

Well, today I altered a frame and created a Thankful piece. I absolutely loved the sentiment from the clear stamp that is in the kit.


I used the clear stamp, papers, flair button and washi tape from the kit to create this! The brown string is from my own stash :)

Here's a close up.


Join me again next Friday for another fun project from the November's Harvest Tradition kit. Love what you see? You can subscribe to the kit HERE.

Challenges:
Get Inky Challenge "Thanks & thanksgiving"
Party Time Tuesdays "Use twine/hemp"

Share
Tweet
Pin
Share
2 comments
It's Tuesday and it's my turn as the DT - to share the Tips & Techniques for All That Stickles blog.

Today, I made my own customized Christmas ornament using some Gold Ice Stickles.


Isn't it pretty? :) To find out how to make one of your own - click HERE.

Happy decorating!

Share
Tweet
Pin
Share
2 comments
Welcome to another All That Stickles Linky Party.

Here are the details for the current Linky Party
-----------------------------------------------------------
Saturday October 12th - Friday October 25th

THEME: Halloween

Create a Halloween project. Ideas: ghosts, goblins, witches, pumpkins, haunted house, monsters, etc. 
  • Suggested Stickles Colors: Black Diamond, Orange Peel, Purple, Firefly, Lime Green, Yellow, Silver, Gold, Frosted Lace, Star Dust

***

October 31st is Halloween and I'm sure most of you are busy creating cards, home decors, trick-and-treat bags... Well, although I do not celebrate Halloween here - here's a fun project using Black Soot Stickles! I'm using the stamp from Unity Stamp "Haunted House Halloween"


Take a look at it when I lit a tea-light candle and put it inside the jar!


Oh yes, it's sparkly!


How did I make the sparkly jar? Just pour some floor cleaner into the jar - then pour in some glitter and just wait for it to dry! :)

Do come join us and link up your Halloween projects here!

Share
Tweet
Pin
Share
2 comments
Welcome to the 1 + 2 = Stickles Blog Hop brought to you by the All that Stickles design team!


Back to school is just around the corner, and what better way to start off the school year then with a bit of sparkle?! Today the design team is showcasing all sorts of glittery back to school projects that kiddos and teachers will love!

If you've come from Sonia's blog,  you're in the right place! If you have just come across the hop and would like to start from the beginning, please visit All that Stickles.

***

For my project, I made a cute little color pencil holder. It can hold sharpies, pens, and even markers! :) The gift comes with a cute Back to School card too :)


 I made the color pencil holder using some Stickled wood pegs (Gold Ice Stickles), hot glued together onto a scalloped cardstock base.  


See how many color pencils it can hold?


I added some Amy Tangerine ribbon and a gold button to complete the look.


The  ribbon is  from Unity Stamp stamped with 7Gypsies number stamp, which I've also Stickled (Dusty Concord / Gold Ice Stickles) and added washi to the ends.


Here's the card :) Of coz I had to add more Stickles (Frayed Burlap) to the clipboard (Unity Stamp). 


***

We have blog candy for those who are a follower of All that Stickles and leave a comment on every stop of the hop! Winners will be announced Wednesday August 21st at All that Stickles.


Fresh Brewed Designs
$15 Gift Certificate

The Paper Parade
$25 Gift Certificate

Bugaboo Stamps
10 Digis of Winner's Choice

Your next stop is Cathie's blog. 

Here's the complete lineup:
All that Stickles
Ashley
Tonya
Ann
Karen N.
Chas
Cathy
Sonia
Angeline
Cathie
Laura
Karen S. 

Thanks for hopping! :) Don't forget to check out our Nature/Outdoors Linky Party!


Challenges:
3GirlJam challenge #24
Party Time Tuesdays challenge #133
Dis Digi Designs "we're going back to school"
Crafting by Designs "Anything Goes"
The Paper Shelter challenge #124
Stamp and Create "Glitter"
DL Art Thankful Thursday August Linky
AUD Sentiments Challenge #87
Share
Tweet
Pin
Share
40 comments
It's Day 4 and my week of being the GIU girl is almost over! I must say that I AM really growing in Unity. Ever since I bought my first stamps from Unity in 2009 I have really changed the way I scrap and create.

Today I have an interesting project. I made this as a birthday gift!


I used an Ikea frame - painted it with some gesso and embellished it with Pink Paislee's Vintage Vogue collection. 

And with every gift, there must be a card right? :) The card is also using the same collection. 


I made the chalkboard effect with some white ink on black. The stamp is so pretty by itself don't you think?

My next card is for the girly girls.


You can never go wrong with pretty Prima flowers & butterflies. :) I added some liquid pearls to the center of each flower and some twine to give some added texture. I also created a Stickles border to add some bling.


And... Here's my final card of the week! 
{Hint: Tomorrow I have an art journal to show!}


I created the marbleized background with some Tim Holtz distress paints. I stitched the border of the card with some embroidery thread and inked up the gorgeous butterfly tree with some Dusty Concord.

Do drop by tomorrow for a special art journal blog hop and more giveaways!!


Talking about giveaways, it's time for a GIVEAWAY!

I'm giving away a big pack of scrappy goodies!


Contents:
My Little Shoebox mini alphabet sticker (1 pack - 460 stickers) /Sweet Treats Stencil Set (4 sheets) / Japanese Chiyogami striped paper (32 sheets) / 7Gypsies Tag (3 pieces) / Smash pad variety (5 pieces) / K&Company tags (6 pieces) / Wood Veneers (16 pieces) / Buttons (16 pieces) / Paper clips (6 pieces) / Mini pegs (4 pieces) / Ribbons (2 pieces) / Crystal flowers (10 pieces) / Pearls (7 pieces) / Paper and satin flowers (20 pieces)   


For a chance to win, all you have to do is:

1. Be a follower of my blog here
2. Like my FB page here

AND Unity is also generously giving away 2 Itty Bitties of your choice to a commenter on my blog this week. So make sure you stop by daily and leave a comment for more chances to win!


[I will be choosing TWO winners - 1 for the scrappy goodie pack and 1 for the Itty Bitties. Winners will be announced next week]


Unity stamps used: Oh my Darling / Your wings exist / Fly Free {KOTM} / Wonderful
Challenges: Simon Says Stamp Happy Mail / Get Inky challenge Fabulous Floral Fun / 3GirlJam Anything goes w/ribbon / All That Stickles Icicle Party / ABC Challenge M for Make it sparkle


Share
Tweet
Pin
Share
31 comments
Older Posts

About Me

Hi. I'm Angeline Choo.
This is a place where I share my latest scrappy ideas, creations and anything scrappy. Read more about me in my Scrappy Resume

Follow Me

  • Facebook
  • Instagram
  • Youtube
  • Twitter
  • Bloglovin

Current Design Team

Unity Stamp

recent posts

Blog Archive

  • ▼  2020 (14)
    • ▼  July (1)
      • Happy 11th Birthday Unity Stamp!
    • ►  May (3)
    • ►  April (1)
    • ►  March (5)
    • ►  February (2)
    • ►  January (2)
  • ►  2019 (18)
    • ►  December (1)
    • ►  November (3)
    • ►  October (3)
    • ►  September (1)
    • ►  August (2)
    • ►  June (2)
    • ►  May (3)
    • ►  April (2)
    • ►  January (1)
  • ►  2018 (37)
    • ►  December (7)
    • ►  November (1)
    • ►  October (1)
    • ►  September (5)
    • ►  August (1)
    • ►  July (3)
    • ►  June (2)
    • ►  May (3)
    • ►  April (1)
    • ►  March (3)
    • ►  February (3)
    • ►  January (7)
  • ►  2017 (80)
    • ►  December (7)
    • ►  November (6)
    • ►  October (6)
    • ►  September (6)
    • ►  August (5)
    • ►  July (9)
    • ►  June (8)
    • ►  May (7)
    • ►  April (8)
    • ►  March (8)
    • ►  February (4)
    • ►  January (6)
  • ►  2016 (109)
    • ►  December (11)
    • ►  November (10)
    • ►  October (12)
    • ►  September (4)
    • ►  August (11)
    • ►  July (10)
    • ►  June (10)
    • ►  May (8)
    • ►  April (8)
    • ►  March (5)
    • ►  February (11)
    • ►  January (9)
  • ►  2015 (147)
    • ►  December (9)
    • ►  November (13)
    • ►  October (15)
    • ►  September (12)
    • ►  August (13)
    • ►  July (9)
    • ►  June (12)
    • ►  May (16)
    • ►  April (11)
    • ►  March (8)
    • ►  February (11)
    • ►  January (18)
  • ►  2014 (132)
    • ►  December (13)
    • ►  November (10)
    • ►  October (13)
    • ►  September (10)
    • ►  August (8)
    • ►  July (10)
    • ►  June (10)
    • ►  May (10)
    • ►  April (13)
    • ►  March (13)
    • ►  February (11)
    • ►  January (11)
  • ►  2013 (175)
    • ►  December (10)
    • ►  November (18)
    • ►  October (19)
    • ►  September (10)
    • ►  August (17)
    • ►  July (13)
    • ►  June (14)
    • ►  May (17)
    • ►  April (12)
    • ►  March (13)
    • ►  February (9)
    • ►  January (23)
  • ►  2012 (74)
    • ►  December (4)
    • ►  November (2)
    • ►  October (14)
    • ►  September (2)
    • ►  August (16)
    • ►  July (9)
    • ►  June (11)
    • ►  May (3)
    • ►  April (3)
    • ►  March (4)
    • ►  February (4)
    • ►  January (2)
Angeline Choo @ ScrappyScrappy. All rights reserved. Be nice. Don't steal. Powered by Blogger.
Facebook Instagram Youtube Twitter Bloglovin
Logo background vector created by denamorado - www.freepik.com

Created with by BeautyTemplates| Distributed By Gooyaabi Templates